

How To Install A Pem Certificate
Guide to add self-generated root certificate regime for viii operating systems and browsers
Easy installation of self-generated root certificates
Install self-generated root certificates
After you lot have generated your root authority with BounCA (Install BounCA), your root certificates needs to exist added to your systems to let them trust your issued certificates. Nigh operating systems offering the ability to add additional trust rules for self-generated root certificate authorities. When the root certificate is trusted by the operating system, the system volition have all its signed certificates.
This guide shows how to add a root document to popular operating systems and browsers. Installation is most times, install the root certificate and all issued certificates are accustomed. Sometimes yous also need to add the intermediate certificates, in the same mode as the root certificate. Afterwards having trusted the document yous volition see the green lock for your self-signed certificates.
The prerequisite is that y'all have downloaded the root certificate file, or made it available via a website. The root document PEM file is public and y'all can distribute it to everyone. While distributing the certificate make sure you use secured connections and provide the fingerprint via a dissever aqueduct then the receiver can verify the root document is non intercepted.
Mac OS X
Bone 10 offers the installation of certificates via a gui interface or via the commandline. We will discuss both methods. Nosotros assume you take stored the root certificate on your file organization.
Keychain GUI
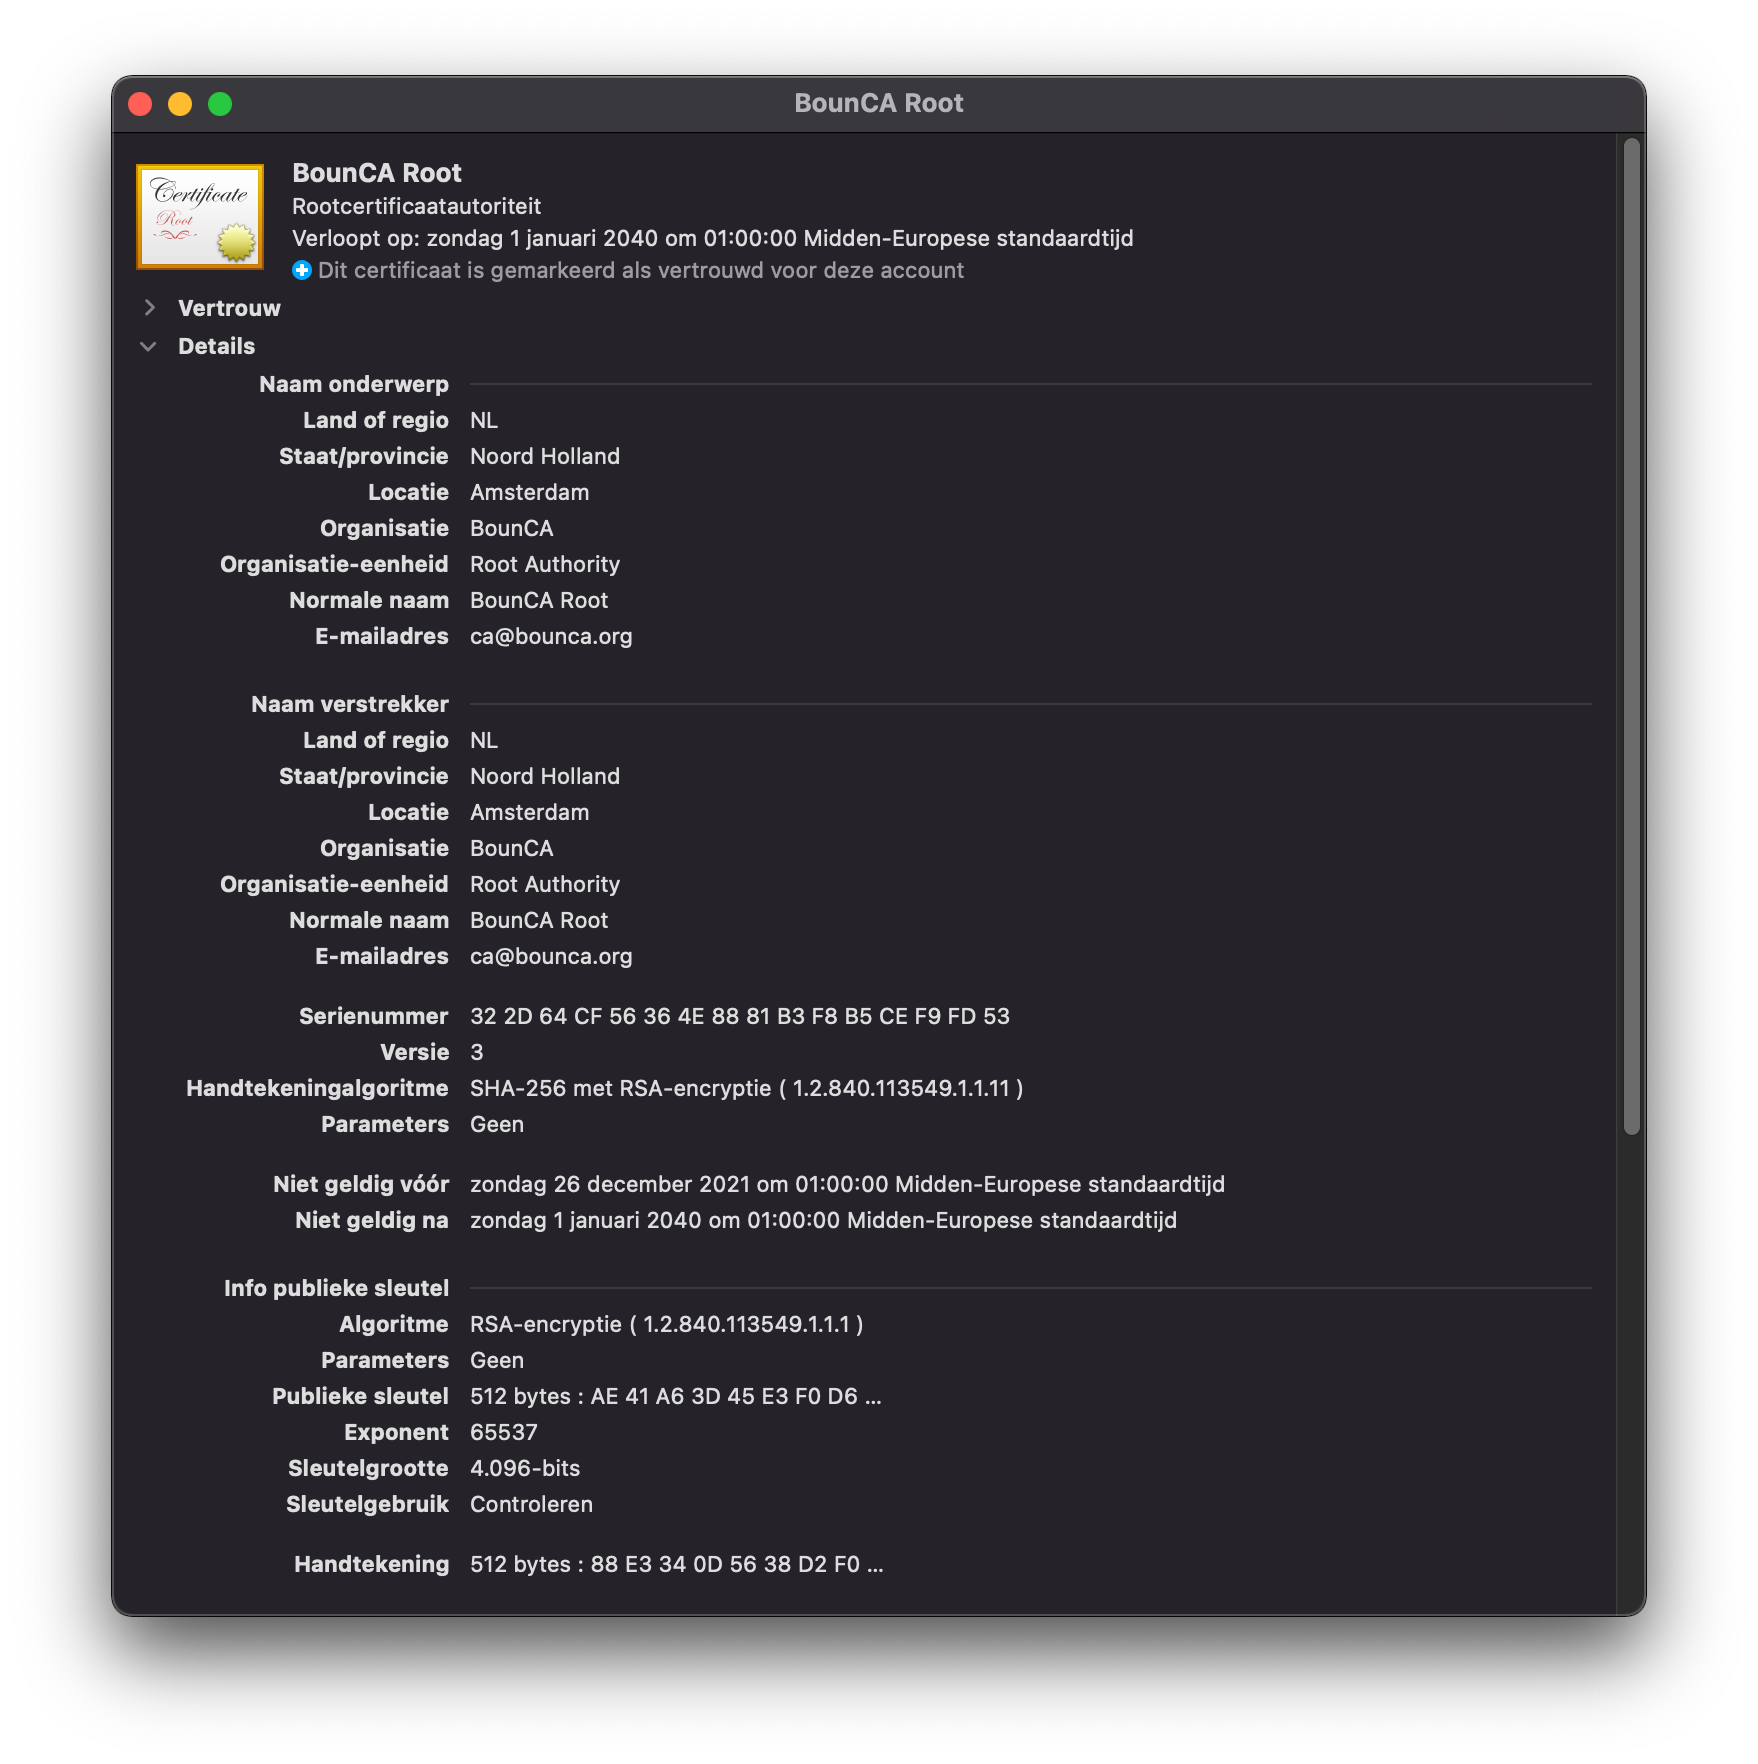
Double click on the certificate file. The key manager programm will start and it volition prove you the certificate. Check the validity of the document.
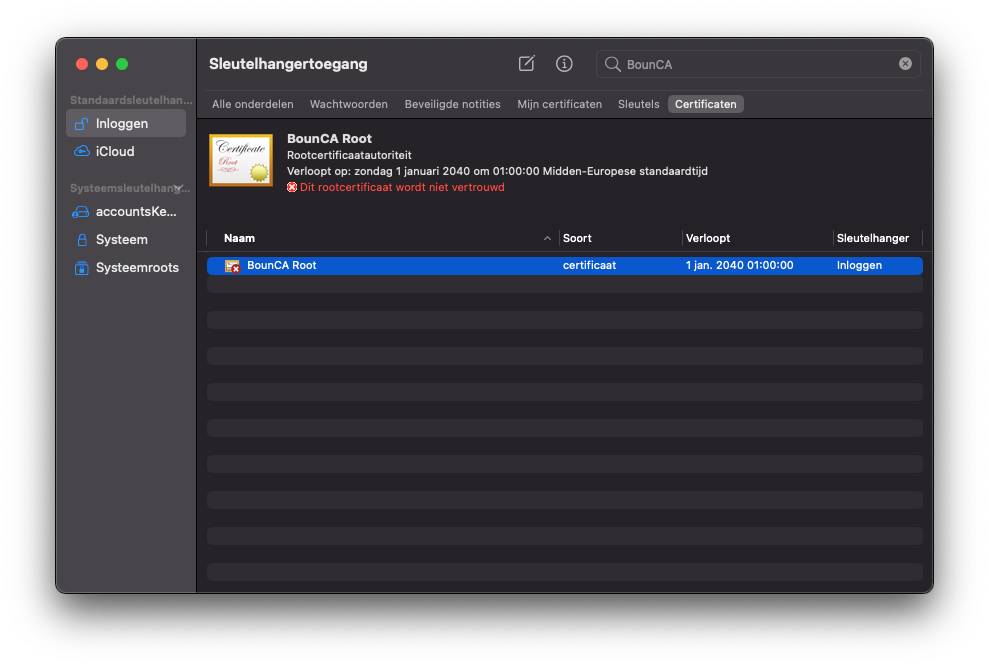
Install root CA pem file on MacOS
Correct click on the document to audit it.
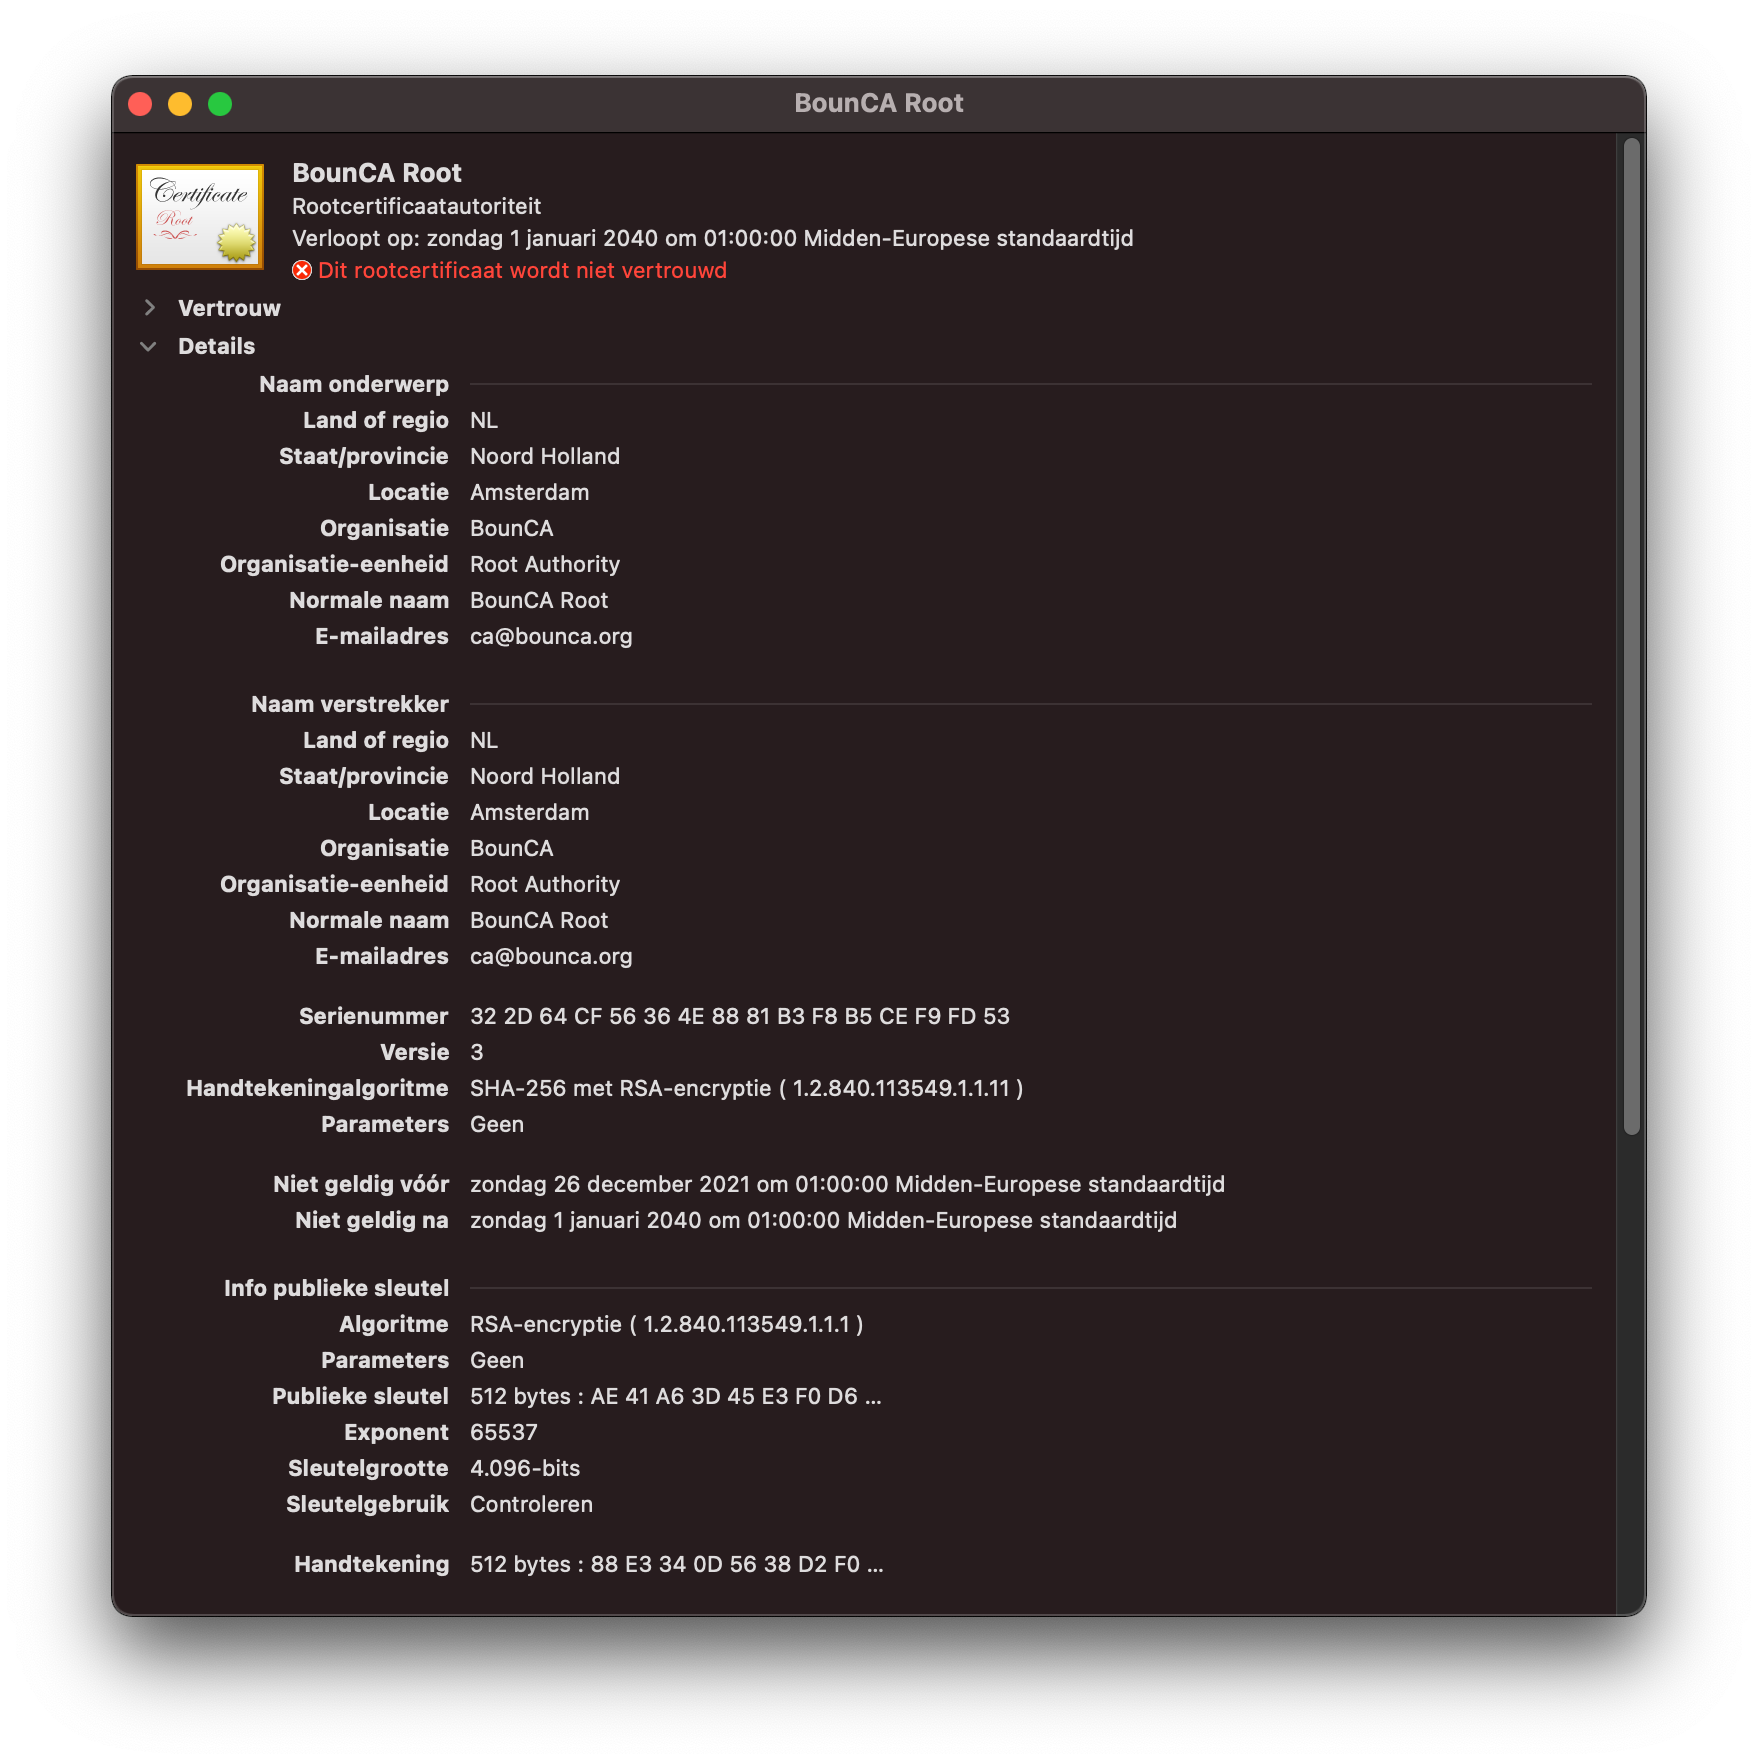
Validate root CA PEM on MacOS
If everything is correct, y'all can trust the document every bit root authority. A dialog pops up to enter your password. MacOS will trust the root CA's signed certificates later on you have added the certificate to your trust chain.
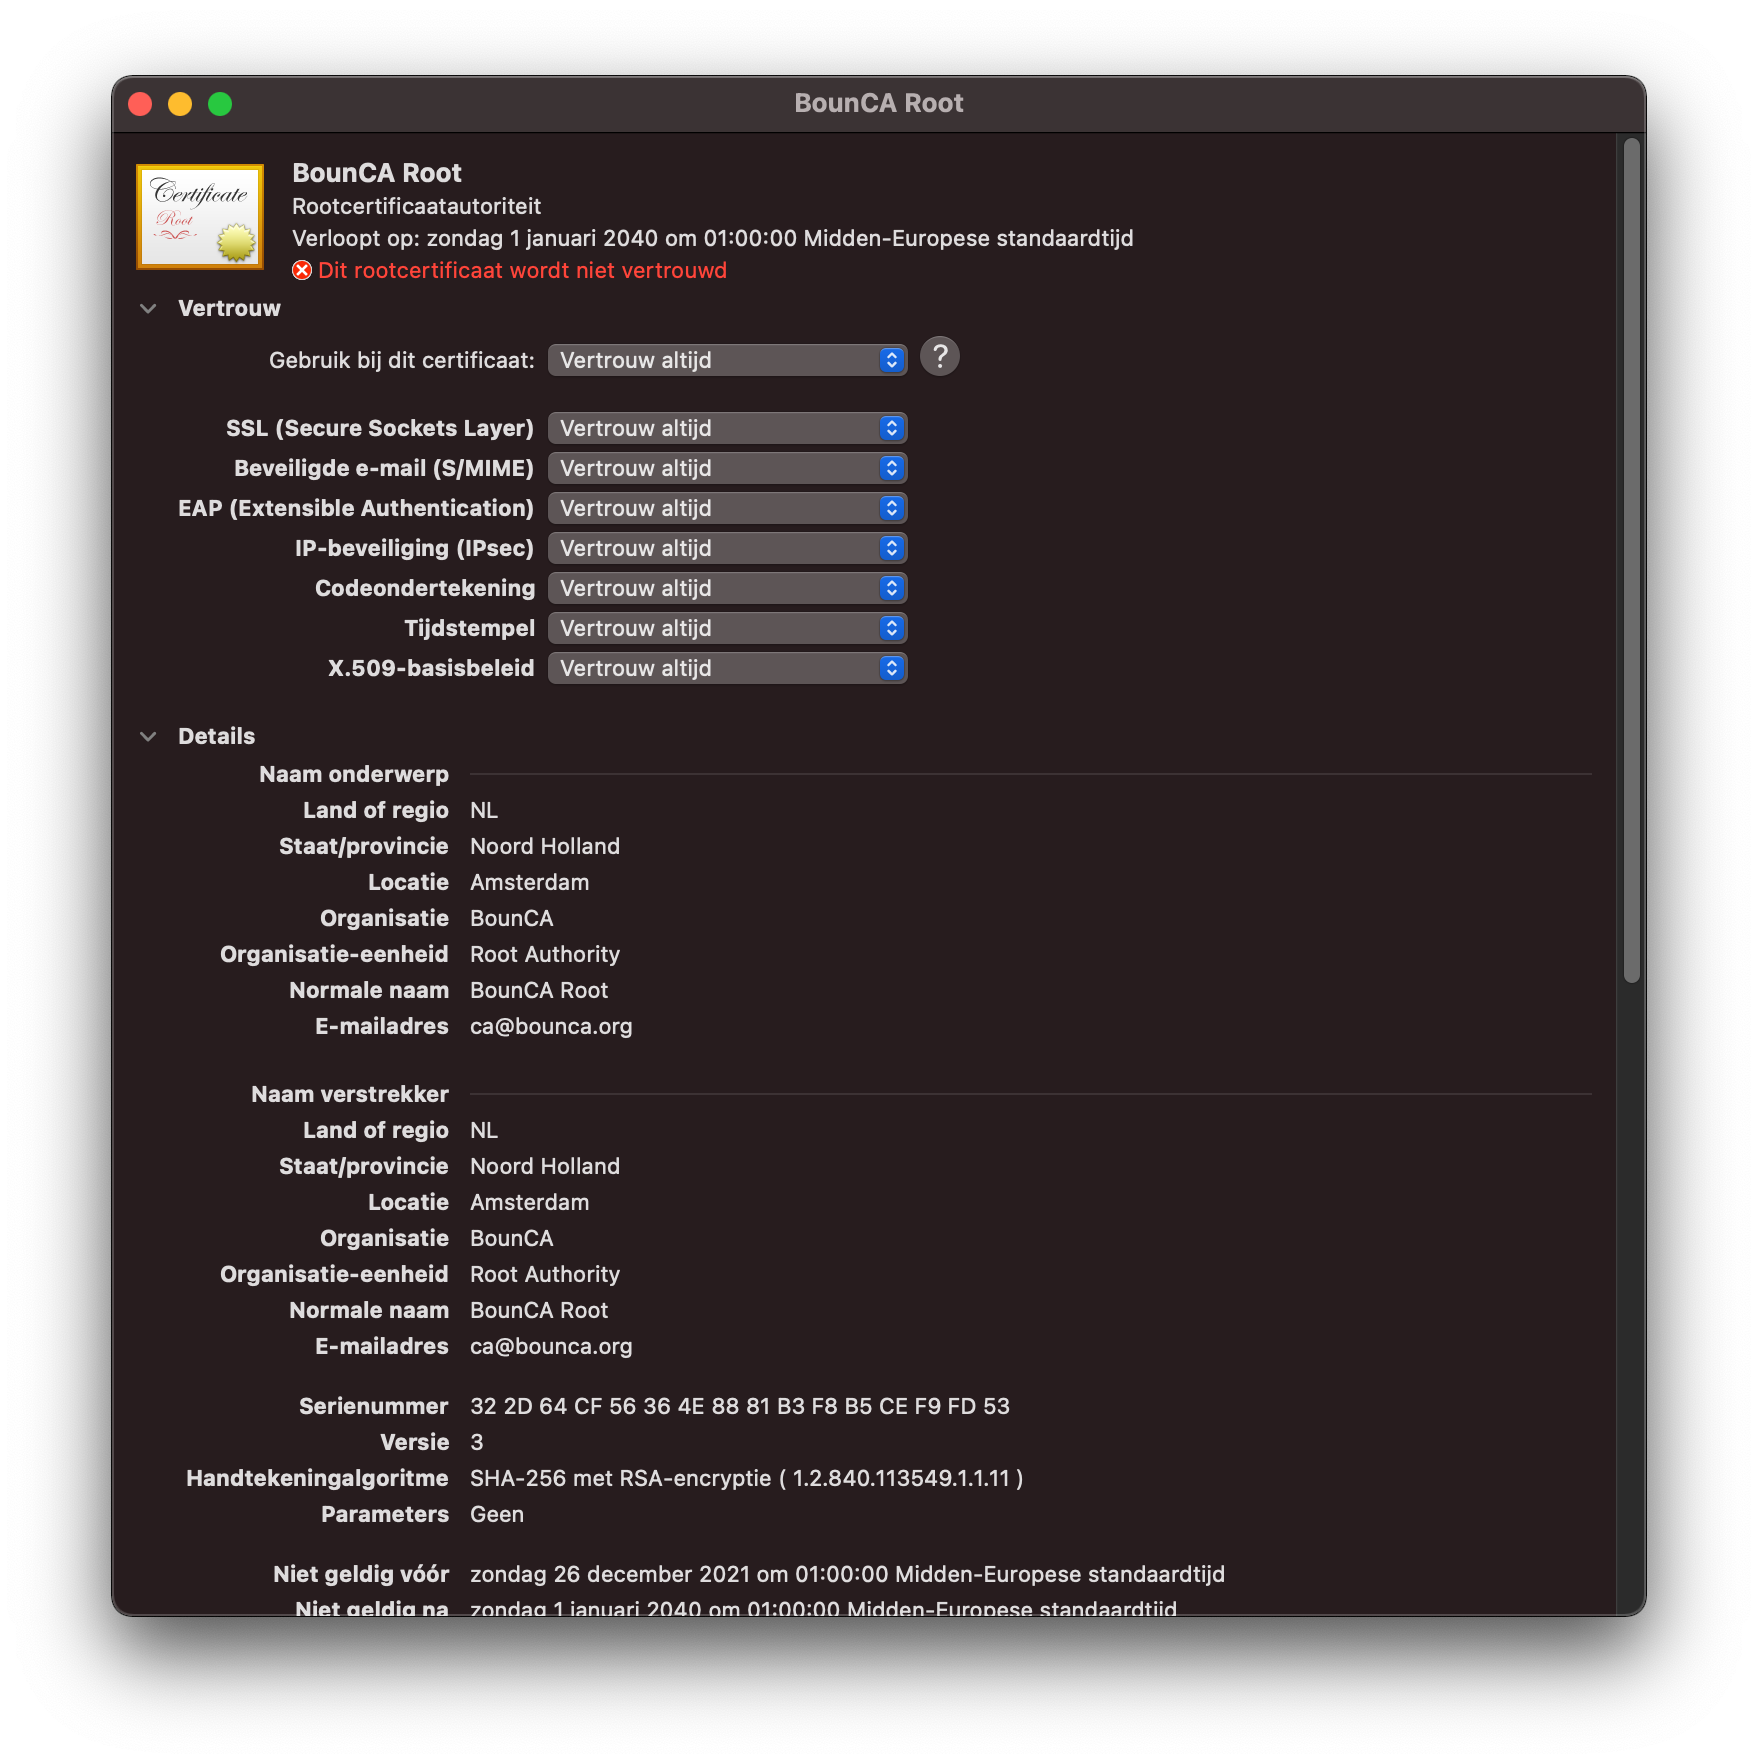
Trust your root certificate
Re-open the cardinal director, search for your root document. You will detect information technology is now trusted past MacOS.
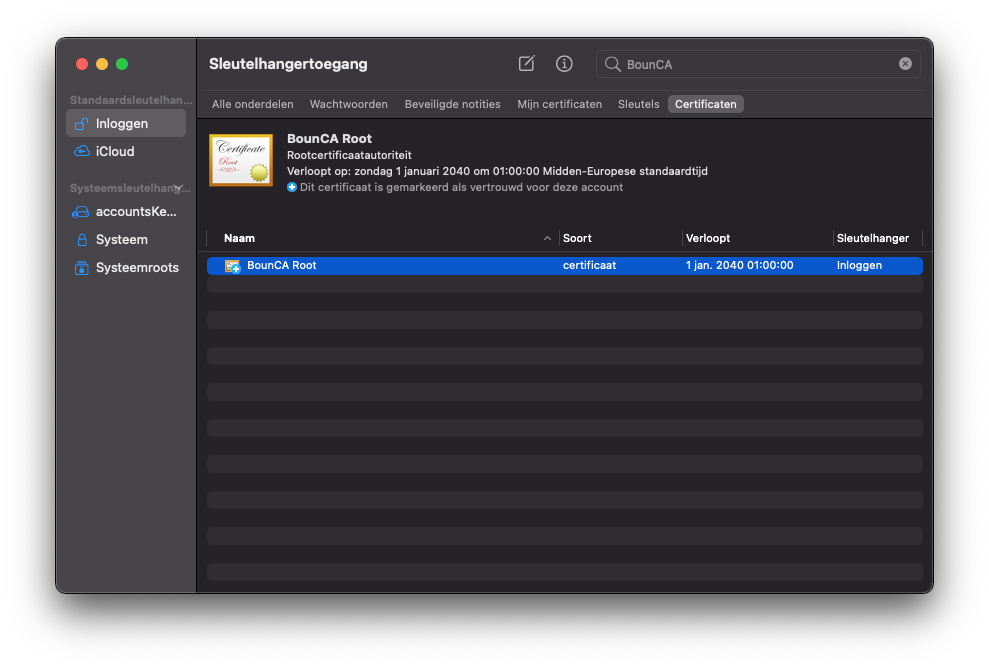
Trusted root certificate
If you audit the certificate you see it is valid and trusted.
Verify root CA has been trusted
Keychain GUI
Os 10 offers also a command line interface to trust and remove certificates.
Use the following command to add a certificate:
sudo security add-trusted-cert -d -r trustRoot -thousand /Library/Keychains/System.keychain <new-root-certificate> Apply the following command to remove a document
sudo security delete-certificate -c "<name of existing certificate>" iPhone, iPad (IOS)
Installing a certificate on an IOS device, such as the iPhone or iPad, is a couple of a few clicks. To go the certificate on the IOS device, you can either mail the document file or provide it via a webserver. After you have downloaded the document to the IOS device, click on it. Information technology opens the following screen.
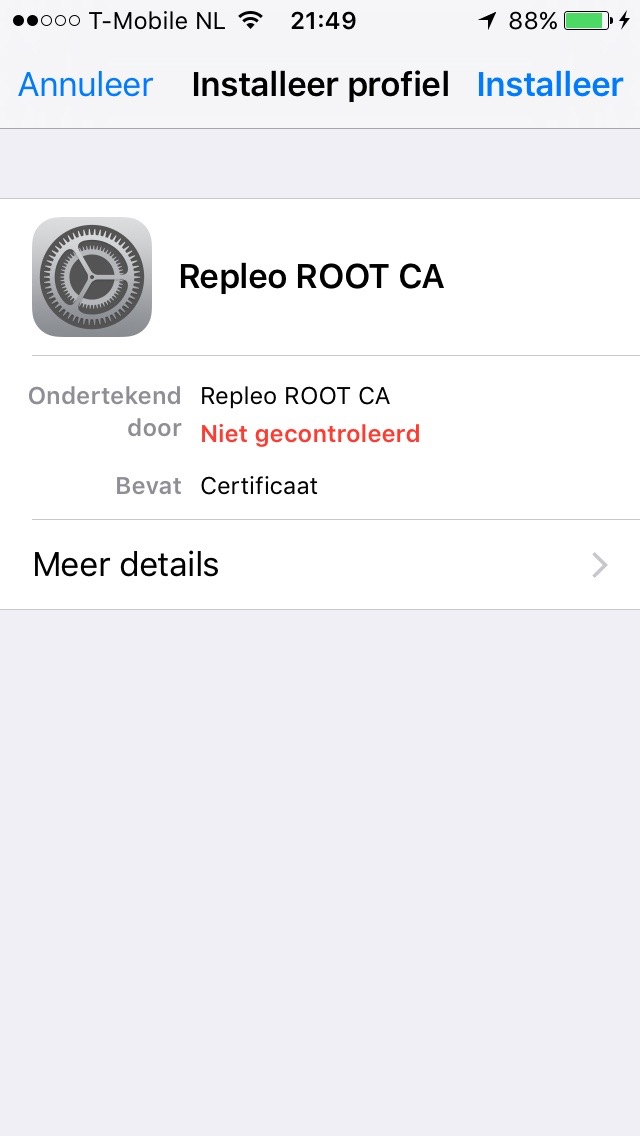
IOS open document
After you have validated that the document is indeed the i you desire to trust, printing the install button.
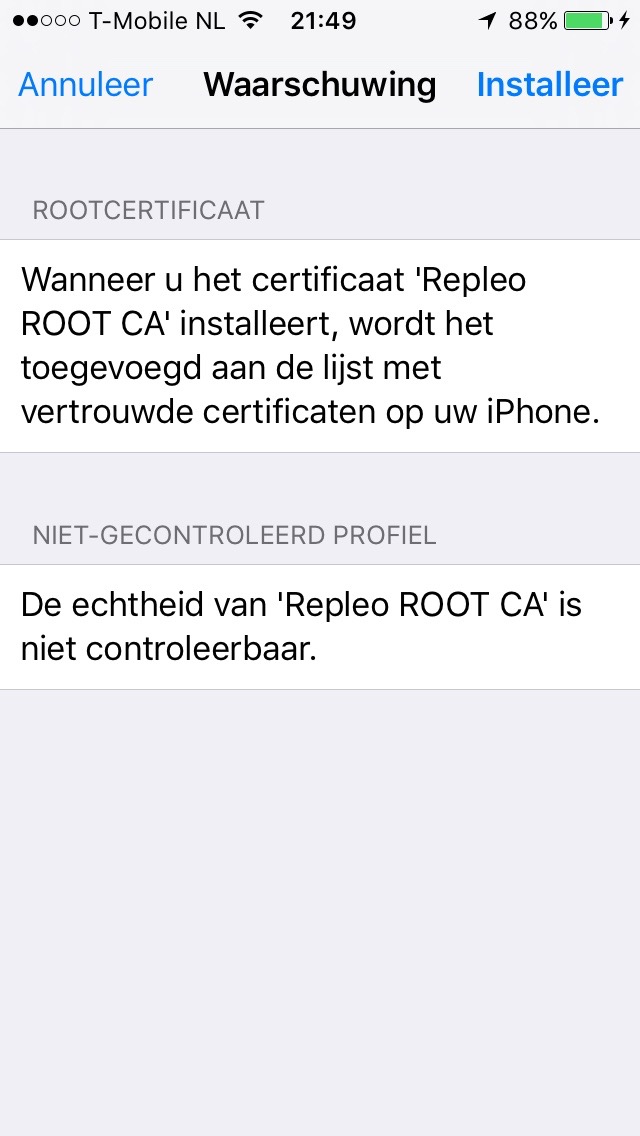
IOS trust new document
IOS volition testify y'all a alarm if you are really sure. The reason of the warning is obvious, if you trust a certificate, it will be possible to perform man-in-the-middle attacks using that document. So, you want to be really certain it is your root certificate. Click on the install and you will see the terminal screen that the certificate has been trusted.
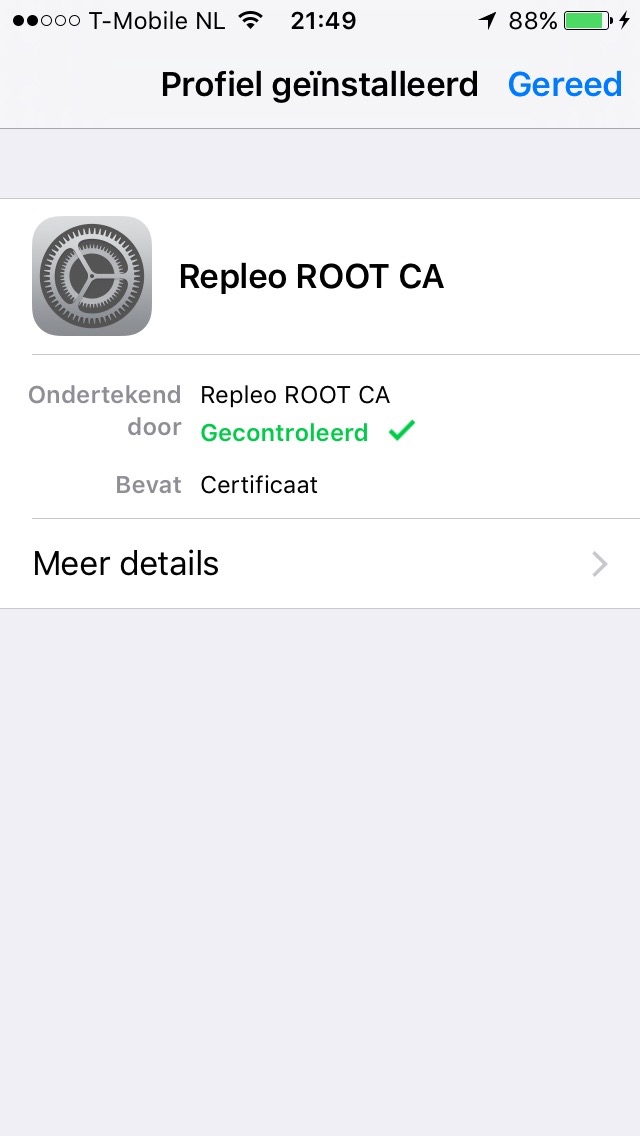
IOS certificate installed
Windows
Brand sure you have the Administrator part or group membership.
You need to perform the post-obit steps to add certificates to the Trusted Root Certification Regime store for a local computer:
-
Click Kickoff, click Kickoff Search, type
mmc, and so press ENTER. -
On the File bill of fare, click Add together/Remove Snap-in.
-
Under Available snap-ins, click Certificates, and then click Add.
-
Under This snap-in will e'er manage certificates for, click Calculator account, and so click Next.
-
Click Local computer, and click Finish.
-
If you lot have no more snap-ins to add to the console, click OK.
-
In the console tree, double-click Certificates.
-
Right-click the Trusted Root Certification Authorities store.
-
Click Import to import the certificates and follow the steps in the Document Import Magician.
After these steps, validate that your root certificate has been added by visiting a site using a signed certificate or your root CA.
Chrome
Depending on the operating system, Chrome is using the organization wide certificates or the certificates of its own scope. In case it uses its own certificates you can add a root certificate to chrome by executing the post-obit steps.
Open up the browser and go to the settings page.
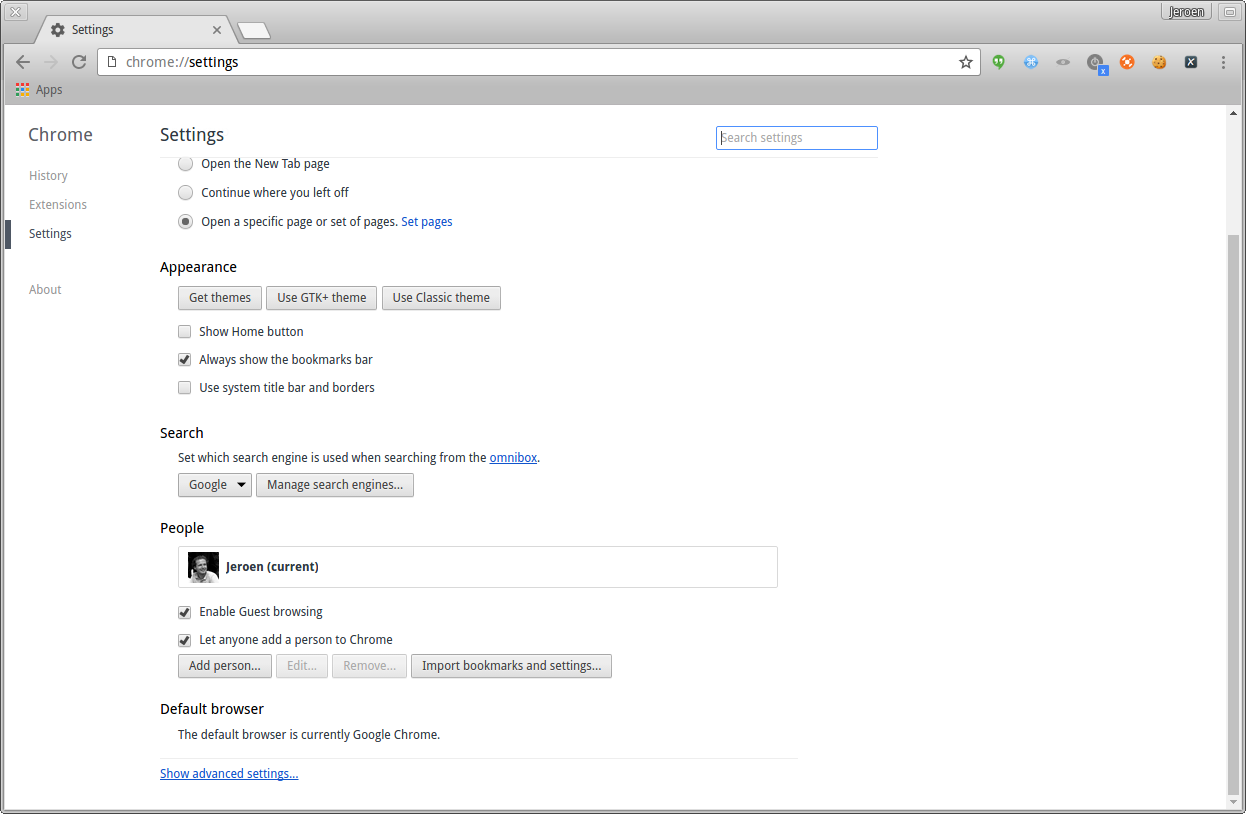
Chrome open up settings page
Go to the advanced settings page, and click on the certificates view.
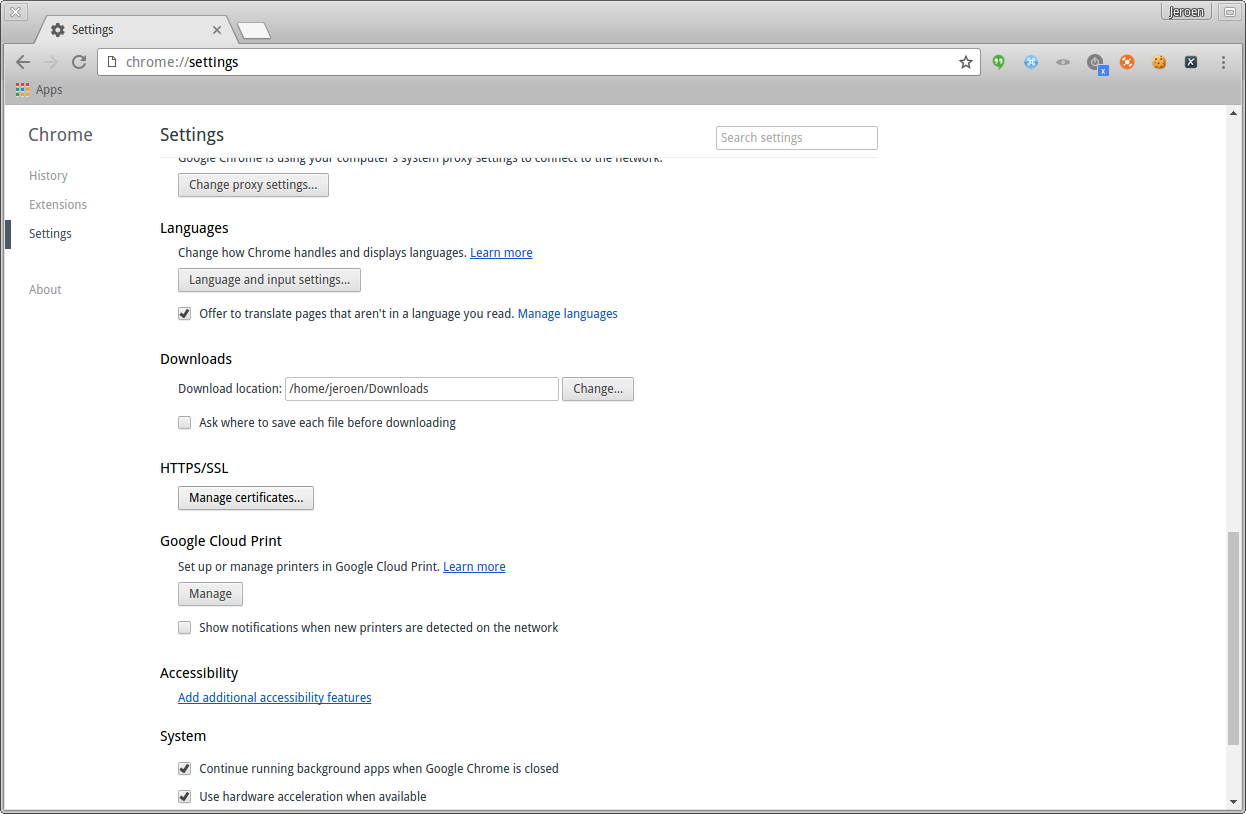
Chrome click on advanced settings and go to certificates
Within the certificates, you need to add the certificate as an authority. Go to the right tab and click the import push.
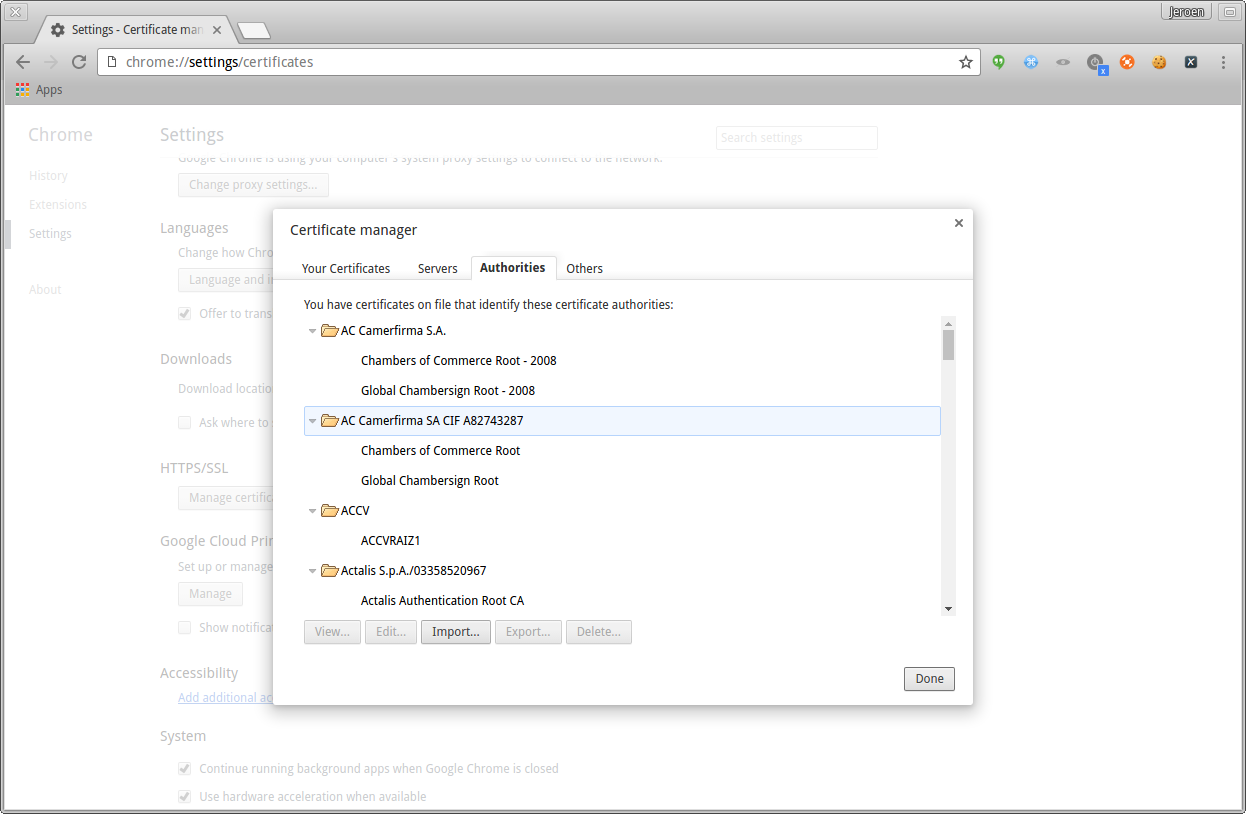
Chrome click on regime and press import button
Select the root document as generated by BounCA.
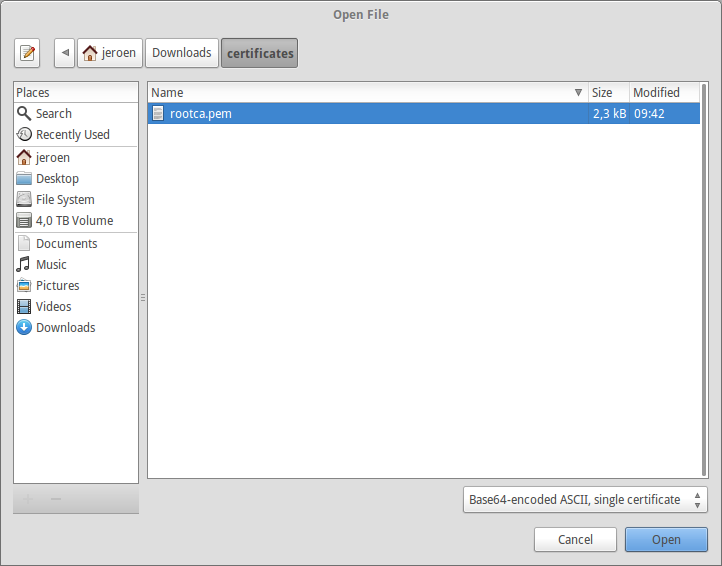
Chrome select the root certificate file
Add the certificate and select the trust levels of it.
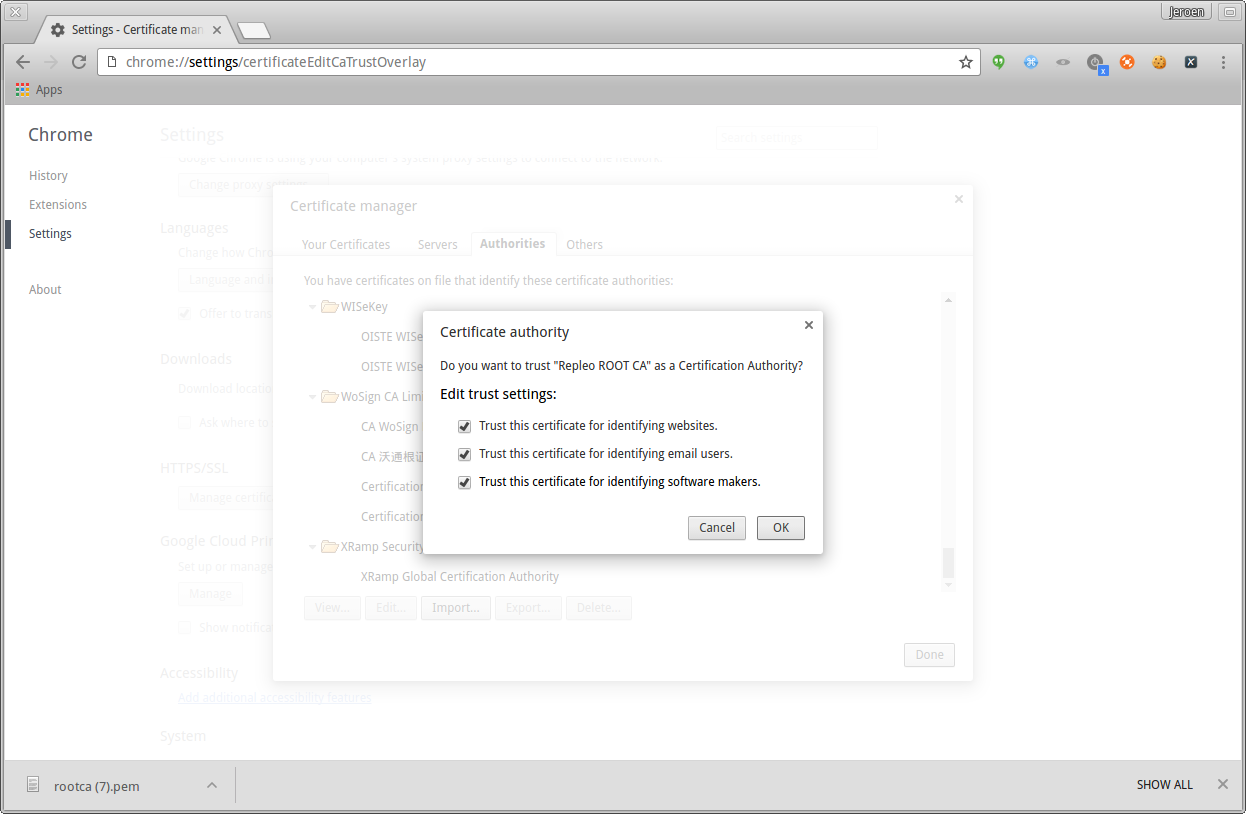
Chrome add the certificate and select trust rules
Subsequently clicking OK, you will notice the root authorization has been added to the authorities list. This ways that all certificates signed past this root CA or its intermediate regime are trusted by Chrome.
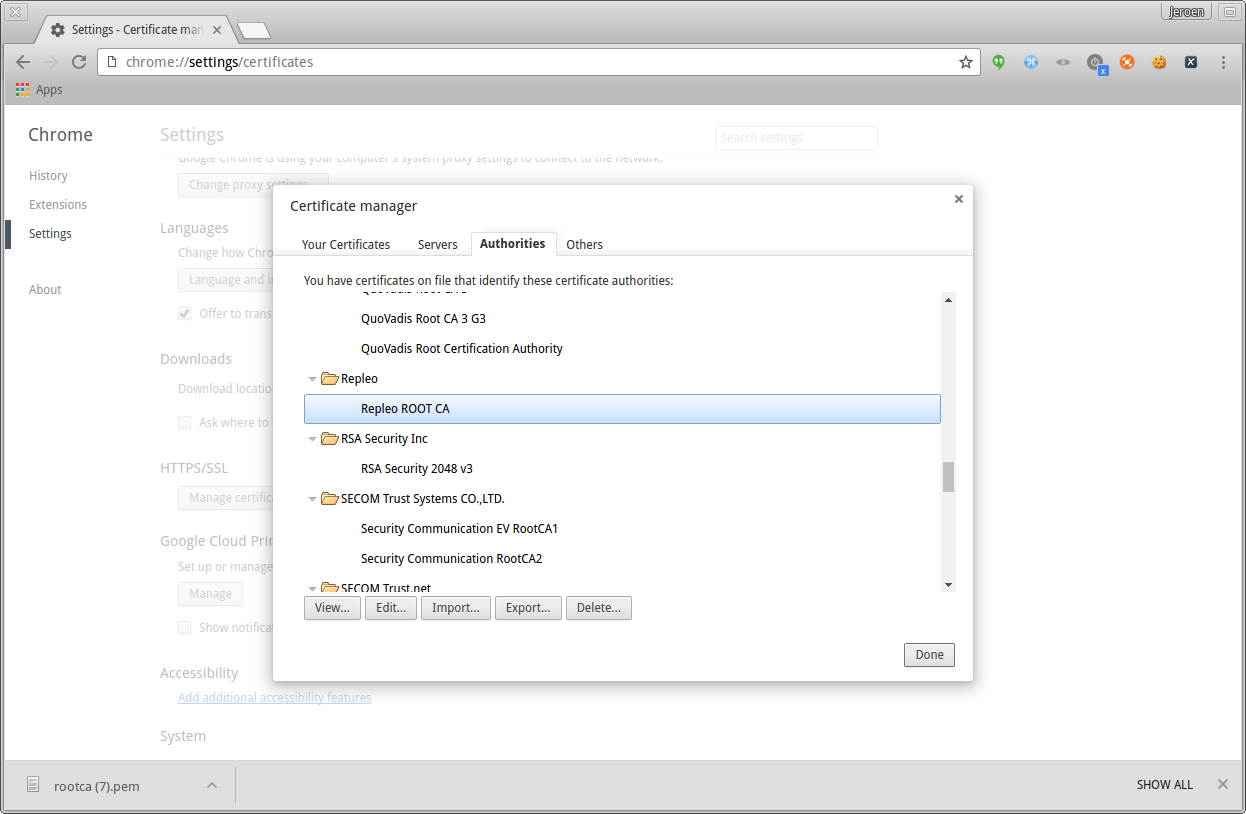
Chrome certificate is added to government list
You may inspect the certificate by pressing the view push button, and check if this is the trusted document. In case y'all don't trust the certificate you can also delete information technology over again.
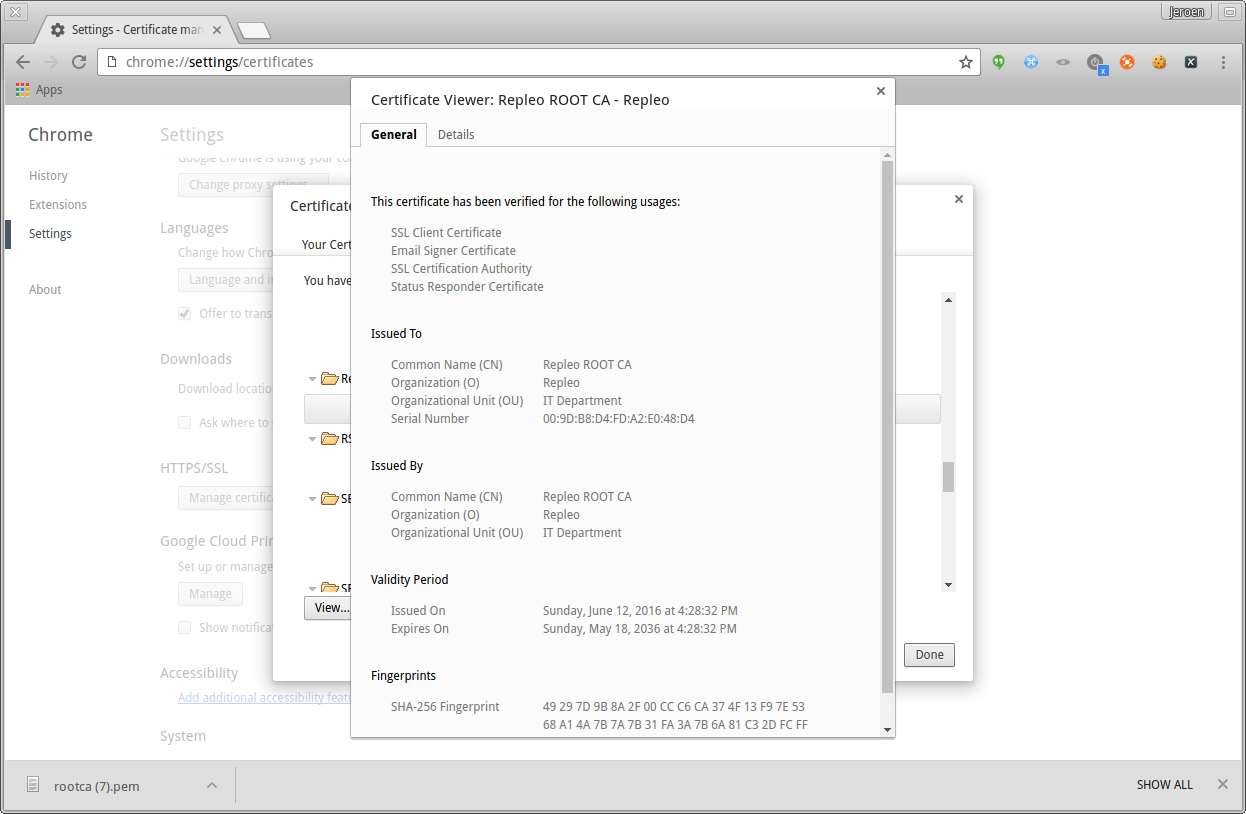
Chrome inspect the certificate past clicking on the view button
The installation is sucessfull. When you lot visit a website using server certificates signed by the individual root say-so, you lot will meet it has a green lock and the connection is trusted.

Chrome visit self-signed website and verify information technology is trusted
Firefox
Firefox manages its own trusted certificate list, so you e'er need to add together the root potency certificate to the browser even if you have installed information technology system wide. To add the document to Firefox execute the following steps.
Open Firefox and go to the settings page.
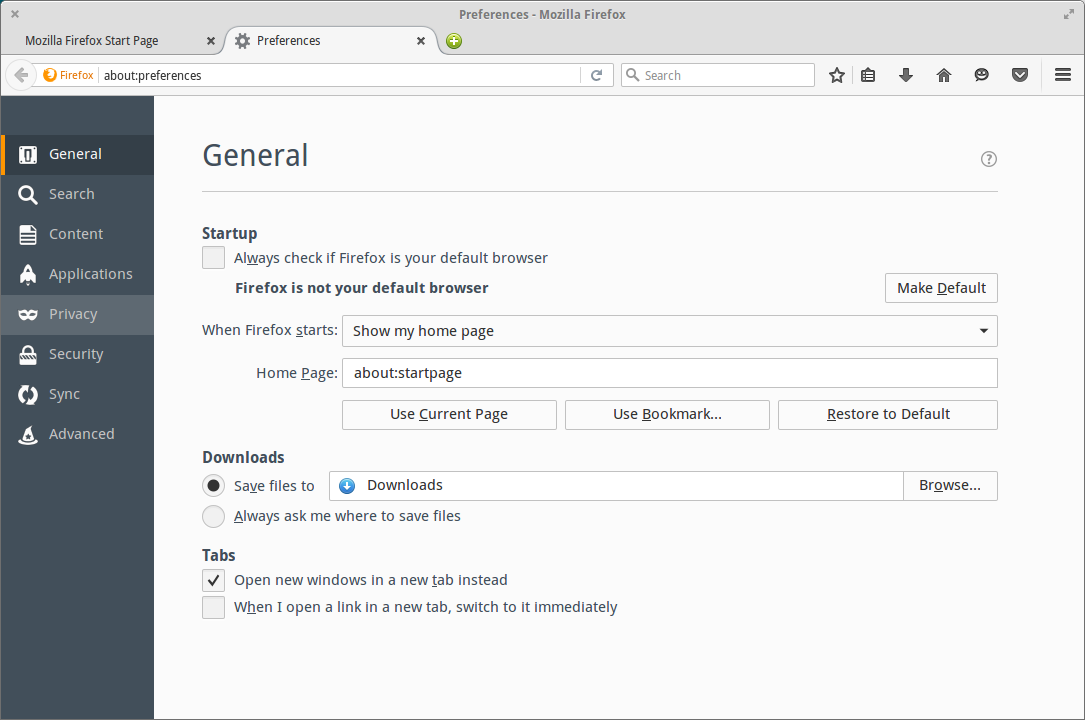
Firefox open settings page
Get to the advanced settings page, and click on the certificates view.
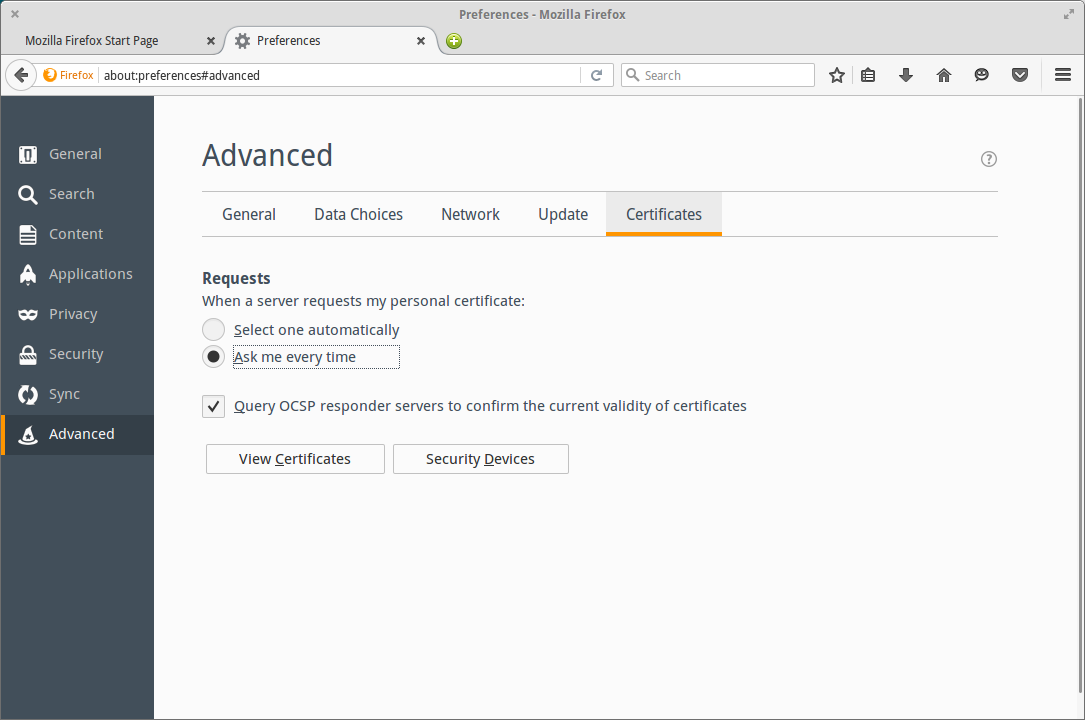
Firefox click on advanced settings and go to certificates view
Inside the certificates, you demand to add the certificate as an authority. Go to the right tab and click the import push button.
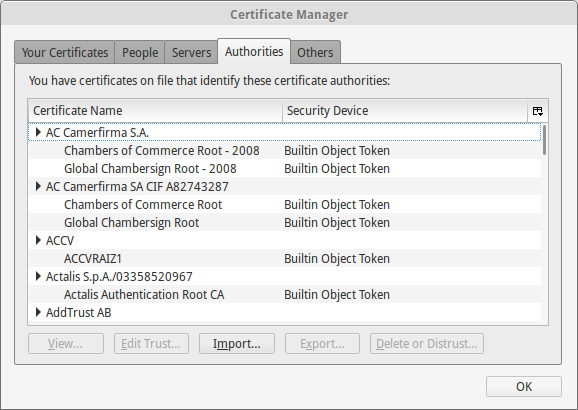
Firefox import the root certificate
Select the root certificate as generated past BounCA.
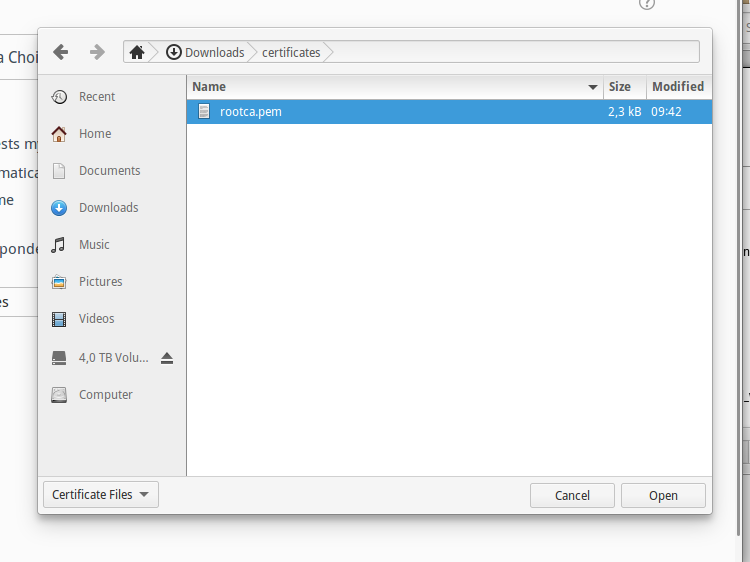
Firefox select the root certificate file
Add the certificate and select the trust levels of it.
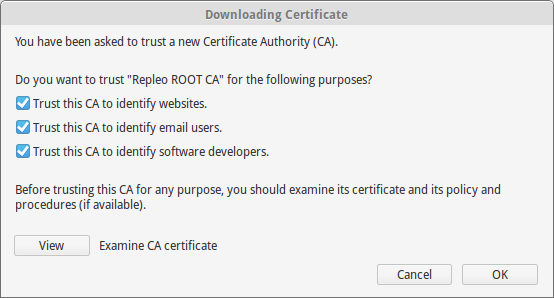
Firefox select trust rules
Subsequently clicking OK, yous will detect the root authority has been added to the authorities list. This means that all certificates signed by this root CA or its intermediate authorities are trusted by Chrome.
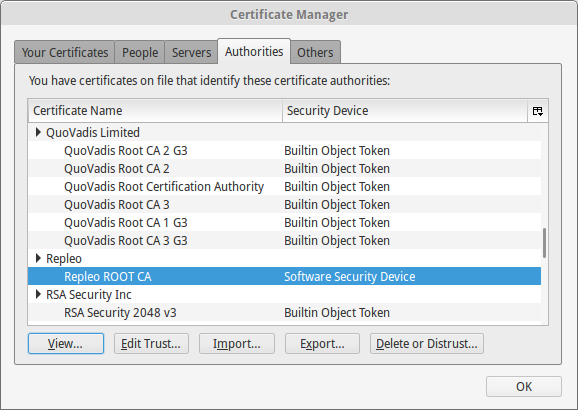
Firefox document is added to authorities listing
Y'all may audit the certificate by pressing the view button, and check if this is the trusted certificate. In example you lot don't trust the certificate you can also delete it again.
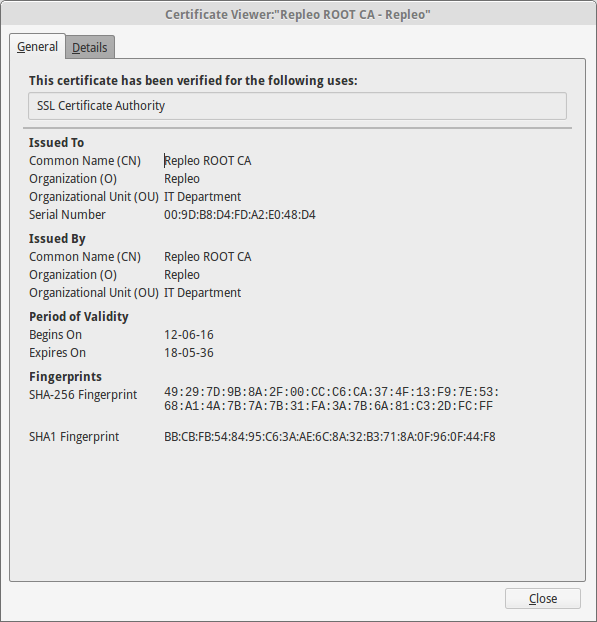
Firefox audit the certificate past clicking on the view button
The installation is sucessfull. When you visit a website using server certificates signed by the individual root authority, you volition encounter it has a greenish lock and the connection is trusted.
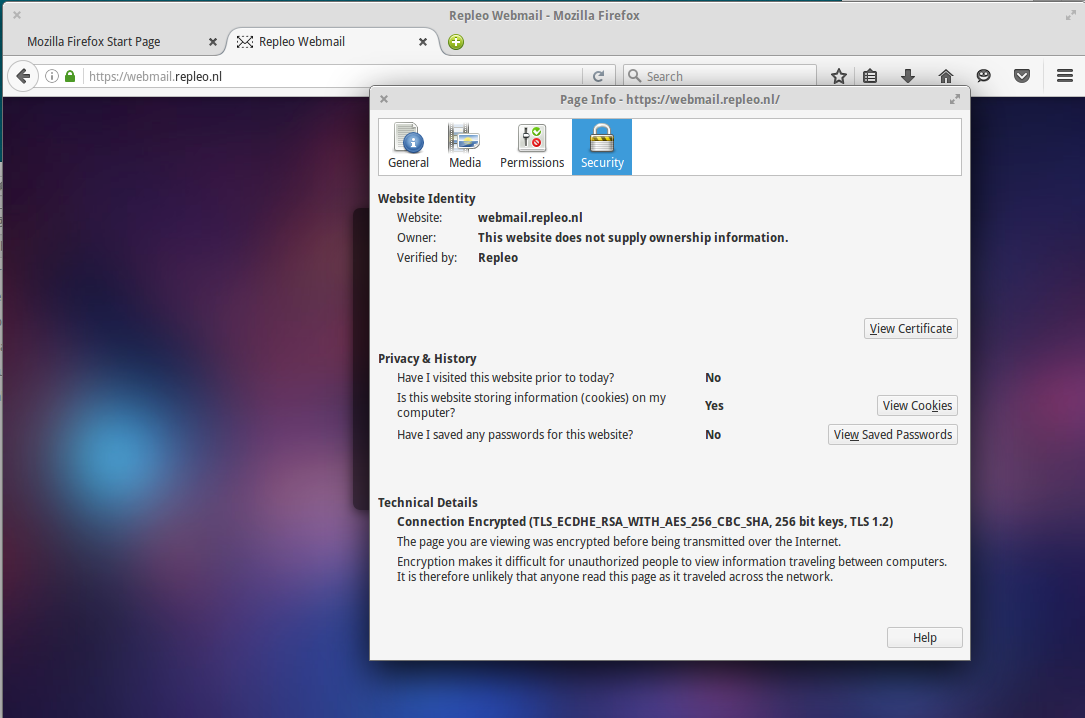
Firefox visit cocky-signed website and verify it is trusted
Linux Ubuntu/Debian
Ubuntu/Debian allows you to install extra root certificates via the /usr/local/share/ca-certificates directory. To install your own root authority certificate re-create your root certificate to /usr/local/share/ca-certificates . Make sure the file has the .crt extension. so rename it when necessary.
Later you copied your document to the /usr/local/share/ca-certificates folder you lot need to refresh the installed certificates and hashes. Inside ubuntu/debian you can perform this activeness via one command:
sudo update-ca-certificates Yous will notice that the command reports it has installed one (or more) new certificate. The certificate has been added to the Operating System and signed certificates will be trusted.
To remove the certificate, simply remove it from /usr/local/share/ca-certificates and run
sudo update-ca-certificates --fresh Linux Reddish Chapeau / CentOS
The installation of a root certificate on Red Hat or CentOS depends on the release. Nosotros hash out release 6 and 5 in this section Red Hat and CentOS
Red Hat / CentOS half dozen
To manage certificates in CentOS half-dozen you need the ca-certificates package. Install this package by the post-obit command
yum install ca-certificates Enable the dynamic CA configuration feature:
update-ca-trust forcefulness-enable Make sure the root document has the .crt extension and copy it to /etc/pki/ca-trust/source/anchors/
cp rootca.crt /etc/pki/ca-trust/source/anchors/ Update the trusted certificate list
Cherry-red Lid / CentOS 5
The older CentOS releases don't offer a certificate director. To install a new root certificate, yous need to add together the certificate to a trusted package file.
cat rootca.crt >> /etc/pki/tls/certs/ca-bundle.crt FreeBSD
FreeBSD doesn't offer a centralized root document manager. If you lot want to add a root authority you lot tin can add it directly to the certificates managed by OpenSSL. This depends on your configuration and is for now out of the scope of this guide.
Java
The JVM has it ain root document shop independent of the operating system. We show how yous can add the root certificate to the JVM, as option when running a Java programme, or to the generic keystore.
Kickoff, get the root certificate. We download our certicate from our Repleo CA. Create a keystore with the keytool command provided by the JDK. You must provide a password, the default one is changeit .
# keytool -import -trustcacerts -alias root -file RepleoRoot.root.pem -keystore repleo.jks Enter keystore password: Re-enter new password: Owner: EMAILADDRESS=ca@repleo.nl, CN=Repleo CA, OU=HQ, O=Repleo, L=Amsterdam, ST=Noord Holland, C=NL Issuer: EMAILADDRESS=ca@repleo.nl, CN=Repleo CA, OU=HQ, O=Repleo, L=Amsterdam, ST=Noord The netherlands, C=NL Serial number: 978e1982d8504ede928ab36078f7ca62 Valid from: Sat Jan 01 01:00:00 CET 2022 until: Sun January 01 01:00:00 CET 2040 Certificate fingerprints: SHA1: 4F:EF:A6:7F:24:83:35:E1:0C:E4:15:AA:0F:68:11:0B:AC:ED:E1:61 SHA256: 6D:2D:D6:3B:DF:1F:20:71:8B:C9:28:2F:13:BC:C5:B7:A8:69:8C:30:8F:43:B1:A9:B8:9D:2F:F6:6A:43:9D:2A Signature algorithm name: SHA256withRSA Field of study Public Primal Algorithm: 4096-bit RSA key Version: 3 Extensions: #1: ObjectId: 2.v.29.35 Criticality=false AuthorityKeyIdentifier [ KeyIdentifier [ 0000: BE 5E 55 2B 28 B6 eighteen 02 CE A1 49 43 0F 73 41 A2 .^U+(.....IC.sA. 0010: 6C 6B 89 09 lk.. ] ] #2: ObjectId: 2.five.29.xix Criticality=true BasicConstraints:[ CA:truthful PathLen:2147483647 ] #3: ObjectId: 2.5.29.15 Criticality=true KeyUsage [ DigitalSignature Key_CertSign Crl_Sign ] #four: ObjectId: 2.5.29.14 Criticality=faux SubjectKeyIdentifier [ KeyIdentifier [ 0000: Exist 5E 55 2B 28 B6 18 02 CE A1 49 43 0F 73 41 A2 .^U+(.....IC.sA. 0010: 6C 6B 89 09 lk.. ] ] Trust this certificate? [no]: yes Certificate was added to keystore You can test the JKS with the post-obit Java HTTPS client programm:
import java.net.* ; import javax.cyberspace.* ; import javax.net.ssl.* ; import java.io.* ; public class HttpSSLTestClient { public static void chief ( String args [] ) throws Exception { String host = "ca.repleo.nl" ; int port = 443 ; SocketFactory factory = SSLSocketFactory . getDefault (); try ( Socket connexion = factory . createSocket ( host , port )) { SSLSocket ssl = ( SSLSocket ) connection ; SSLParameters sslParams = new SSLParameters (); sslParams . setEndpointIdentificationAlgorithm ( "HTTPS" ); ssl . setSSLParameters ( sslParams ); PrintWriter wtr = new PrintWriter ( connection . getOutputStream ()); wtr . println ( "Get / HTTP/1.ane" ); wtr . println ( "Host: " + host ); wtr . println ( "" ); wtr . flush (); BufferedReader input = new BufferedReader ( new InputStreamReader ( connection . getInputStream ())); Cord message = input . readLine (); System . out . println ( "Got the message: " + message ); } } } Compile the program, and run it:
# javac HttpSSLTestClient.java # java HttpSSLTestClient Exception in thread "main" javax.net.ssl.SSLHandshakeException: PKIX path building failed: sun.security.provider.certpath.SunCertPathBuilderException: unable to observe valid certification path to requested target at java.base/lord's day.security.ssl.Alert.createSSLException(Warning.java:131) at java.base of operations/sunday.security.ssl.TransportContext.fatal(TransportContext.java:325) at java.base of operations/sunday.security.ssl.TransportContext.fatal(TransportContext.java:268) at java.base/dominicus.security.ssl.TransportContext.fatal(TransportContext.java:263) at java.base of operations/sun.security.ssl.CertificateMessage$T13CertificateConsumer.checkServerCerts(CertificateMessage.java:1340) ... more Y'all get an fault as the host is not trusted. The Coffee Keystore needs to exist added to the JVM truststore. You lot need to provide the parameter javax.cyberspace.ssl.trustStore and javax.net.ssl.trustStorePassword .
# java -Djavax.net.ssl.trustStore=repleo.jks -Djavax.net.ssl.trustStorePassword=changeit HttpSSLTestClient Got the bulletin: HTTP/1.i 200 OK When successful, you lot see the expected 200 OK answer. The root certificate tin can also be added to the truststore of the JVM. Below the command to add the root certificate to the JVM on MacOS. The countersign of the cacerts keystore is changeit .
# /usr/libexec/java_home /Library/Java/JavaVirtualMachines/jdk-14.0.ii.jdk/Contents/Home # consign JAVA_HOME=/Library/Java/JavaVirtualMachines/jdk-14.0.two.jdk/Contents/Home # sudo keytool -import -trustcacerts -file RepleoRoot.root.pem -allonym repleoca -keystore $JAVA_HOME/lib/security/cacerts Password: Alert: utilize -cacerts selection to admission cacerts keystore Enter keystore password: Owner: EMAILADDRESS=ca@repleo.nl, CN=Repleo CA, OU=HQ, O=Repleo, Fifty=Amsterdam, ST=Noord Holland, C=NL Issuer: EMAILADDRESS=ca@repleo.nl, CN=Repleo CA, OU=HQ, O=Repleo, 50=Amsterdam, ST=Noord Holland, C=NL Serial number: 978e1982d8504ede928ab36078f7ca62 Valid from: Sabbatum Jan 01 01:00:00 CET 2022 until: Sun Jan 01 01:00:00 CET 2040 Certificate fingerprints: SHA1: 4F:EF:A6:7F:24:83:35:E1:0C:E4:fifteen:AA:0F:68:11:0B:AC:ED:E1:61 SHA256: 6D:2d:D6:3B:DF:1F:20:71:8B:C9:28:2F:thirteen:BC:C5:B7:A8:69:8C:30:8F:43:B1:A9:B8:9D:2F:F6:6A:43:9D:2A Signature algorithm name: SHA256withRSA Bailiwick Public Fundamental Algorithm: 4096-bit RSA fundamental Version: 3 Extensions: #1: ObjectId: 2.v.29.35 Criticality=faux AuthorityKeyIdentifier [ KeyIdentifier [ 0000: Be 5E 55 2B 28 B6 xviii 02 CE A1 49 43 0F 73 41 A2 .^U+(.....IC.sA. 0010: 6C 6B 89 09 lk.. ] ] #ii: ObjectId: 2.five.29.19 Criticality=true BasicConstraints:[ CA:true PathLen:2147483647 ] #3: ObjectId: 2.5.29.15 Criticality=true KeyUsage [ DigitalSignature Key_CertSign Crl_Sign ] #4: ObjectId: 2.5.29.14 Criticality=fake SubjectKeyIdentifier [ KeyIdentifier [ 0000: BE 5E 55 2B 28 B6 18 02 CE A1 49 43 0F 73 41 A2 .^U+(.....IC.sA. 0010: 6C 6B 89 09 lk.. ] ] Trust this certificate? [no]: yeah Certificate was added to keystore # java HttpSSLTestClient Got the message: HTTP/1.1 200 OK In case you use Debian, or Ubuntu, your java cacerts keystore via the ca-certificates-java package. Or in case you lot run Arch linux, yous can employ java-cacerts.

Source: https://www.bounca.org/tutorials/install_root_certificate.html
Posted by: fordquatere.blogspot.com
0 Response to "How To Install A Pem Certificate"
Post a Comment